MOUNTAIN BIKES
get ready to rip
Setting up a mountain bike is the most labor intensive of the different bikes we sell, but the payoff in handling, confidence, fun and safety is all well worth it. Plus, once you've got a proper foundation established, you can then start tweaking the finer adjustments of the suspension to dial your bike in perfectly for your personal preferences. Let's get started!
cockpit setup
This is where you're going to spend all your time, so let's make it comfortable and safe. Wondering why there is a photo of a stem next to a handlebar column and handlebar photo by the stem header? Read on!
Handlebar
Let’s start with handlebar height. The height of your handlebar determines your body position over the front end of the bike and affects handling through your weight distribution on the wheels. There is no formula for this adjustment. It’s reliant completely on your riding style, body type (arm length, height, etc), and preferred feel of your bike.
The spacer rings between the stem and the top of the headset are where you make this adjustment. By adding or removing the sequence of spacers on either side of the stem, you are raising or lowering the handlebar height of the bike. These rings come in many thicknesses and allow fine tuning of handlebar height. Naturally, once you have it where you want it, the steer tube can be cut so you don't have to keep spacers on the top side of the stem.
Handlebar width is something you'll have to play with. Ride the bike for a few weeks and if the bar feels too wide, it can be trimmed down easily by our service department. Too narrow is unlikely with modern bike spec, but we can certainly source wider handlebars as required.
Stem
While we’re at the stem interface, let’s address handlebar rotation. This is the degree to which the handlebar is fixed in the stem along its horizontal axis. You will note that handlebars have a rise and a bend out where the grips are installed. These two angles are known as sweep – upsweep and backsweep. Some riders like the bends flat, some like them swept up a bit. It’s all about preference, but a good baseline is to determine what makes your grip the most comfortable and solid. Try to find equal pressure on the inside and outside of your palms and dial the roll to where you’re most comfortable. A good starting point is to have the rise in the bar at 90 degrees to start.
STem continued...
A note on stem clamp / face tightening: Don’t just start reefing down on the two top bolts to get things tight. You’re trying to achieve balance on your bike and likewise your bike appreciates balance as well. Use the diagonal pattern as shown at right, and keep the clamp face an even distance from the stem as you tighten to spec.
brake levers
Again, pretty much personal preference. However, we’ve got enough experience to advocate for one overall goal: always start from an angle that keeps your wrist in line with your forearm. Set this one up while in a “descent ready” or standing position on the bike and it will translate to the sitting position seamlessly.
brake levers continued...
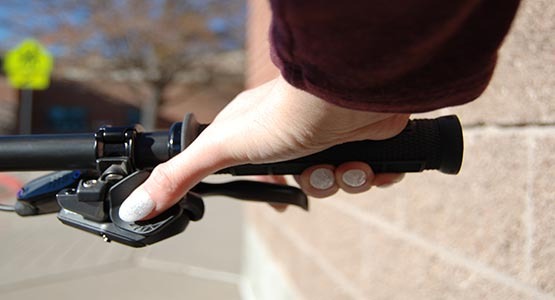
The next adjustment to make is where your fingers engage the levers. Like any lever, the most power can be applied out at the end-most point from the fulcrum. See where the levers have a smooth little hook at the end? That’s where you want the first knuckle of your index fingers to engage the lever. Setup correctly, that one finger on each lever is all you need to power and completely control the braking functionality of your bike.
Once you’ve established the proper angle and grip distance and tightened down the lever clamps to proper torque spec (you used a torque wrench, right?) it’s time to move on to dialing in lever throw length. Everyone has different hand sizes and finger lengths, and this is why you will find that brake manufacturers have installed an adjuster that determines the distance from the grip to the lever. Some have a dial, some have a little hex screw. These adjusters move the lever closer to or farther away from the grip.
Now that all of this done, take a look from one side of the bike across to the other and see if both levers are at an equal angle and plane. You can also just lay a level or yard stick across them to get a hard measurement. The goal? Make certain they are even and identical in angle.
shifter & dropper post levers
Last two lever bits to adjust, promise! Since the advent of the 1X drivetrain, we’ve just one derailleur shifter to sort out. On the left side, where the front derailleur shifter used to reside, we’ve now got a lever for the dropper post. The key to setting these two is to place them so you can utilize them without moving your hands on the grips.

saddle
Next up is saddle height. A good way to set this is to get in your cycling shoes and clip in. With a pedal at six o'clock, your knee should be slightly bent. How much is too much? Unclip and put your heel on the pedal. Your knee should be this close to locking out. If it's not, raise the saddle a few millimeters and try again.
Once that position is set, adjust the fore-and-aft of the saddle. The goal here is to have your knee over the pedal spindle / ball of your foot with the pedal at three o'clock. Fitters use a plumb bob to check this, but you can do it with a string or even a yardstick.
Last up is reach, which is the distance from your saddle to your handlebar. This is where comfort lives. The saddle, once loosened, will slide fore and aft on its rails, allowing you to fine tune the distance from your saddle to your handlebar. Additionally, you can play with the angle of the saddle from level to a few degrees either direction. Most riders like the saddle level, but you are the best judge for your own backside.
A note on saddle interface: there are two protuberances of bone at the base of the pelvis. The scientific name for them is ischial tuberosities, but we simply call them sit bones. You want your weight supported on these bones, NOT on the soft tissue of the perineal area ahead of them. Adjust the fore and aft to where you’re seated and can comfortably reach your handlebar without locking your elbows, while keeping in mind where your sit bones are resting on the saddle. Adjust it forward and back and try the positions until it’s situated perfectly.
grips
One last thing to consider is grips. Everyone will have a preference on grips, likely very different from the next person. Grips come in varying thickness, firmness, shape, and of course, color. You’re just going to have to figure what you like most. Still, there are a couple rules:
Get lock-on grips. These grips have collars with bolts in them that engage an inner sleeve, allowing you to essentially bolt them to your bars. The first time you have to finish a ride in the rain and your grips aren’t sliding around like calamari on a chopstick, you’ll thank us.
Fat grips + small hands = forearm pump up. That sounds awful, and it is. If your hands are small and your grips are thick, your forearms have to work double time to keep your hands gripping your handlebar. It’s fatiguing and can get dangerous after extended periods. Get thinner grips if you have little hands.
pedals
With mountain bikes, pedals are a pretty big subject with myriad options. To help you navigate the subject more follow the link below.
suspension setup
There are some differences in setup between the suspension manufacturers, so you’ll first need to determine the maker of the fork and shock on your bike. All of the bikes sold at WRC feature suspension products from Fox Racing Shocks and Rock Shox – arguably the industry standard for mountain bikes today.
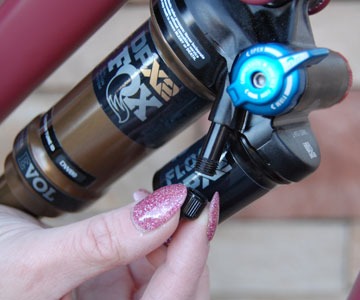
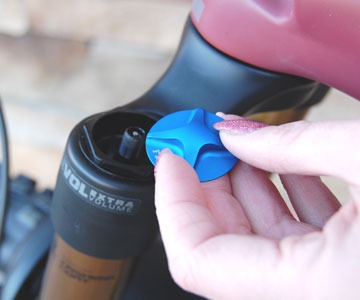
First tool you’re going to need is a shock pump. Here are where the air valves are on your fork and shock. Simply uncap the valve, screw on the pump, and add or remove pressure using the gauge to set exact pressure desired.
DATA & SET UP RECOMMENDATIONS
Now for the data. While this setup can certainly be performed with the tried-and-true sag method, the best way to get optimum performance from your suspension is to be more precise and do it by body weight, ride characteristics, and handling preference to customize the tune of your shock and fork. Suspension manufacturers maintain comprehensive tuning guides on their websites that will provide an excellent baseline from which to begin. And that baseline may well be all you ever want to ride with – they are that good! Here are some helpful links:
fox racing shocks

rock shox
bike makers' suspension recommendations
All our bike manufacturers host recommended setup information for their various models on their websites:
Santa Cruz
Santa Cruz maintains this info on each bike’s page. Scroll to the bottom under TECH SUPPORT and select the Shock Setup tab:
juliana
geometry adjustments
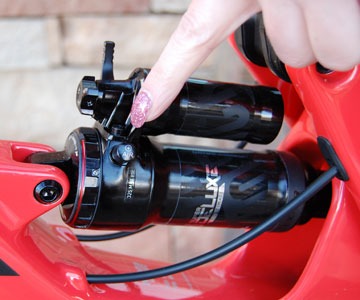
So now that you have the air pressure, compression, and rebound setup, some of you need to consider the flip chip technology in your new frame. This applies to these bikes:
Trek mino link
There are high and low settings that adjust the height of the bottom bracket and the steepness of the head angle. In HIGH the BB is lifted 10mm and steepens the headtube angle by a half degree from LOW. Generally speaking, HIGH will be more agile and less stable, with a lower chance of pedal strike, and the opposite is what to expect in LOW. Here’s what Trek has to say about it:
specialized flip chip
The FlipChip at the rear shock eye provides a bottom bracket height change of 7mm and a head tube angle of one-half degree.
Additionally – on the EVO iterations of Stumpjumper – there is an eccentric headset cup with three settings to adjust the headtube angle. There is also another chip in the Horst link at the rear axle to get another 7mm of BB adjustment, and last but not least, there is The MulletLink. The MulletLink is an aftermarket part that will allow you to run a 27.5 rear wheel with a 29 front wheel while retaining the suspension characteristics of the bike. How ‘bout that?
Santa Cruz Flip Chip
The Flip Chip in the chainstay allows for a 10mm +/- adjustment to the chainstay length and another Flip Chip in the dropout allows for 3.5mm +/- adjustment to bottom bracket height. Here’s what Santa Cruz has to say about it, along with plenty more intel:

Mountain Bike Tires
Lastly, let's talk tires. Your bike is new and you won't need them for awhile yet, but the day will come when baby needs new shoes. The choices you have available can drastically affect the performance of your bike. Dive into tire knowledge and considerations through the link below.